

In today’s rapidly evolving digital landscape, securing your network infrastructure is more critical than ever. Azure Firewall is a robust, cloud-native network security service designed to protect your Azure Virtual Network resources. This comprehensive guide will walk you through the steps to configure Azure Firewall for network security, ensuring your environment is fortified against potential threats.
Table of Contents
Introduction of Azure Firewall
Azure Firewall is a managed, cloud-based network security service that protects your Azure Virtual Network resources. It provides advanced threat protection that meets the changing needs of your cloud environment. With built-in high availability and unrestricted cloud scalability, Azure Firewall offers stateful firewall capabilities, network and application-level filtering, and threat intelligence.
Azure Firewall is offered in three SKUs: Standard, Premium, and Basic.
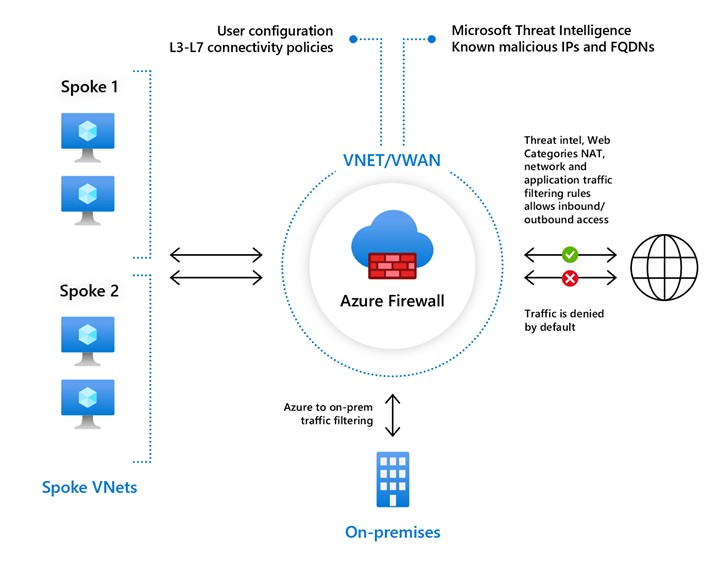
Azure Firewall Standard
Azure Firewall Standard provides L3-L7 filtering and threat intelligence feeds directly from Microsoft Cyber Security. Threat intelligence-based filtering can alert and deny traffic from/to known malicious IP addresses and domains that are updated in real time to protect against new and emerging attacks.
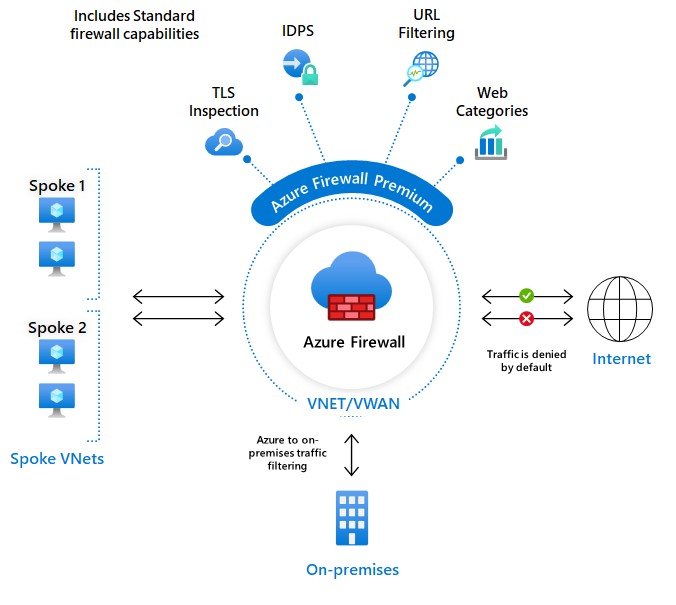
Azure Firewall Premium
Azure Firewall Premium provides advanced capabilities include signature based IDPS to allow rapid detection of attacks by looking for specific patterns. These patterns can include byte sequences in network traffic or known malicious instruction sequences used by malware. There are more than 67,000 signatures in over 50 categories that are updated in real time to protect against new and emerging exploits. The exploit categories include malware, phishing, coin mining, and Trojan attacks
Azure Firewall Basic
Azure Firewall Basic is intended for small and medium size (SMB) customers to secure their Azure cloud environments. It provides the essential protection SMB customers need at an affordable price point.
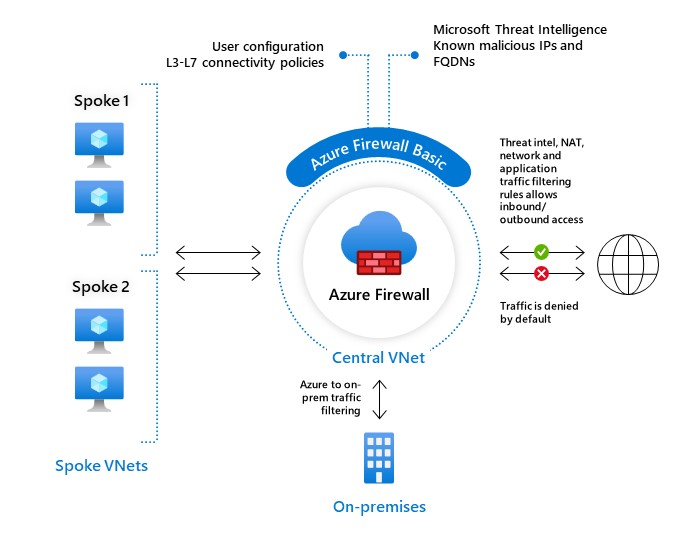
Azure Firewall Basic is like Firewall Standard, but has the following main limitations:
- Supports Threat Intel alert mode only
- Fixed scale unit to run the service on two virtual machine backend instances
- Recommended for environments with an estimated throughput of 250 Mbps
Why Azure Firewall?
Azure Firewall is an essential tool for organizations aiming to secure their Azure environments. It provides several key benefits:
Stateful Firewall as a Service: Azure Firewall is a fully stateful firewall as a service with built-in high availability and unrestricted cloud scalability.
Network and Application-Level Filtering: You can filter traffic both at the network layer (Layer 3) and application layer (Layer 7).
Threat Intelligence: Integrates with Microsoft Threat Intelligence to provide alerting and blocking of traffic from known malicious IP addresses and domains.
Centralized Policy Management: Simplifies security management with a single control plane for firewall rules across multiple subscriptions and virtual networks.
Prerequisites
Before you begin configuring Azure Firewall, ensure you have the following:
– >An active Azure subscription.
– >Basic understanding of Azure networking concepts.
– >Azure CLI or Azure PowerShell installed and configured on your local machine.
Step-by-Step Guide to Configuring Azure Firewall
Step 1: Create a Resource Group
A resource group is a container that holds related resources for an Azure solution. All resources in a resource group should share the same lifecycle.
1. Sign in to the Azure portal: [https://portal.azure.com](https://portal.azure.com)
2. Create a resource group:
– In the left-hand menu, select “Resource groups” > “Add”.
– Enter the Resource group name and select the Subscription.
– Choose the Region where you want the resource group to be located.
– Click “Review + create” and then “Create”.
Step 2: Create a Virtual Network
A Virtual Network (VNet) is a representation of your own network in the cloud. It logically isolates your instances launched in the cloud from others.
1. Create a virtual network:
– In the left-hand menu, select “Create a resource” > “Networking” > “Virtual Network”.
– Enter the necessary details:
– Name: Enter a unique name for your VNet.
– Address space: Enter the IP address range (CIDR block) for the VNet.
– Subscription: Select your subscription.
– Resource group: Select the resource group you created earlier.
– Location: Choose the same region as your resource group.
– Click “Review + create” and then “Create”.
Step 3: Create a Subnet for Azure Firewall
Subnets are segments of a virtual network’s IP address space. You need to create a subnet specifically for Azure Firewall.
1. Create a subnet:
– Go to your VNet and select “Subnets” > “Add Subnet”.
– Enter the Subnet name (e.g., AzureFirewallSubnet).
– Enter the Subnet address range (e.g., 10.0.0.0/24).
– Click “Add”.
Step 4: Deploy Azure Firewall
1. Deploy the Azure Firewall:
– In the left-hand menu, select “Create a resource” > “Networking” > “Firewall”.
– Enter the necessary details:
– Name: Enter a unique name for your firewall.
– Subscription: Select your subscription.
– Resource group: Select the resource group you created earlier.
– Location: Choose the same region as your resource group.
– Virtual Network: Select the VNet you created earlier.
– Subnet: Select the AzureFirewallSubnet.
– Public IP address: Create a new public IP address for the firewall.
– Click “Review + create” and then “Create”.
Step 5: Configure Azure Firewall Rules
Azure Firewall rules define the traffic filtering policies for your network. There are three types of rules: Application rules, Network rules, and NAT rules.
1. Create Application Rules:
– Go to your Azure Firewall and select “Rules” > “Application rule collection” > “Add application rule collection”.
– Enter the necessary details:
– Name: Enter a unique name for the rule collection.
– Priority: Enter a priority value (lower numbers indicate higher priority).
– Action: Select “Allow” or “Deny”.
– Rules: Define the individual rules within the collection (e.g., FQDN, Protocol, Source IP, etc.).
– Click “Add”.
2. Create Network Rules:
– Go to your Azure Firewall and select “Rules” > “Network rule collection” > “Add network rule collection”.
– Enter the necessary details:
– Name: Enter a unique name for the rule collection.
– Priority: Enter a priority value (lower numbers indicate higher priority).
– Action: Select “Allow” or “Deny”.
– Rules: Define the individual rules within the collection (e.g., Source IP, Destination IP, Protocol, Port, etc.).
– Click “Add”.
3. Create NAT Rules:
– Go to your Azure Firewall and select “Rules” > “NAT rule collection” > “Add NAT rule collection”.
– Enter the necessary details:
– Name: Enter a unique name for the rule collection.
– Priority: Enter a priority value (lower numbers indicate higher priority).
– Action: Select “DNAT” or “SNAT”.
– Rules: Define the individual rules within the collection (e.g., Source IP, Destination IP, Translated IP, Protocol, Port, etc.).
– Click “Add”.
Step 6: Integrate with Threat Intelligence
Azure Firewall can be integrated with Microsoft Threat Intelligence to provide enhanced security.
1. Enable Threat Intelligence:
– Go to your Azure Firewall and select “Threat intelligence” > “Settings”.
– Select the “Alert and Deny” option to enable blocking and alerting for traffic from known malicious IP addresses and domains.
– Click “Save”.
Step 7: Monitor and Manage Azure Firewall
1. Monitor Firewall Activity:
– Navigate to “Logs” in the Azure Firewall settings.
– Enable diagnostics to send log data to Azure Monitor, Log Analytics, or Event Hub.
– Use Azure Monitor and Log Analytics to create dashboards and alerts based on firewall activity.
2. Manage Firewall Configuration:
– Regularly review and update firewall rules to ensure they meet your security requirements.
– Use Azure Policy to enforce compliance and governance for firewall configurations.
Best Practices for Azure Firewall Configuration
1. Implement Least Privilege Access: Configure firewall rules to allow only the necessary traffic. Avoid overly permissive rules.
2. Use Application and Network Rules: Leverage both application and network rules to provide granular control over traffic.
3. Enable Threat Intelligence: Integrate with Microsoft Threat Intelligence to block traffic from known malicious sources.
4. Monitor Firewall Activity: Regularly monitor firewall logs and metrics to identify and respond to potential security threats.
5. Automate Configuration Management: Use Infrastructure as Code (IaC) tools like Azure Resource Manager (ARM) templates or Terraform to automate firewall configuration and deployment.
Conclusion
Azure Firewall is a powerful tool for securing your Azure network infrastructure. By following the step-by-step guide outlined in this post, you can configure Azure Firewall to protect your virtual network resources effectively. Leveraging best practices such as least privilege access, threat intelligence integration, and continuous monitoring will help ensure your network remains secure against evolving threats.
Stay tuned for more insights in our 30 Days of Azure Security series, where we continue to explore advanced security features and strategies for protecting your cloud environment.
Stay tuned for more insights in our 30 Days of Azure Security series!